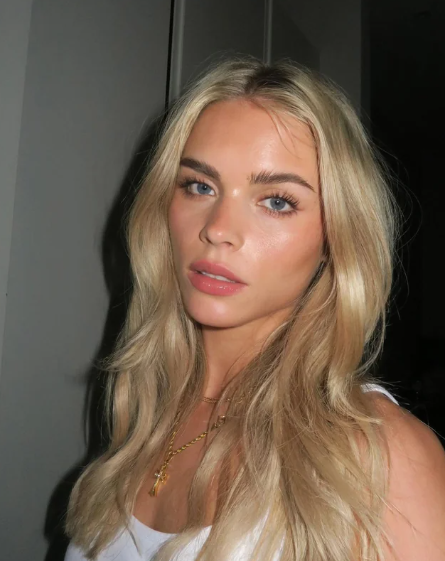
Happy Friday! I hope you’re looking forward to a fun weekend. Today, I’m excited to share an easy, glowing makeup look that will have you looking fresh, awake, and radiant in no time. This is one of my go-to looks when I’m short on time or haven’t had the best night’s sleep (which, let’s be honest, happens often). The combination of flushed cheeks, shimmering eyes, and rosy lips brings a natural brightness to the face and is perfect for the weekend. Plus, I’ll be sharing some of my all-time favorite products along the way!
Step 1: Prep and Base
First, I always start with good skincare to ensure a smooth base. I love using Tata Harper’s Illuminating Moisturizer to hydrate and prep my skin. After moisturizing, I applied Urban Decay’s Naked Skin Concealer in Fair Neutral under my eyes, around my nostrils, and on my chin and forehead. This concealer provides great coverage where needed, and I like to apply it in these specific areas for a brightened look.
For foundation, I used Chanel’s Vitalumiere Aqua, applied lightly with a brush. I misted my It Cosmetics Fully Flawless Blush Brush with some rosewater spray for an airbrush effect. This brush is technically meant for blush, but I find the angle is perfect for applying foundation evenly and getting into the contours of my face. I then blended everything out with a damp Beauty Blender for a seamless, natural finish. To lock everything in place, I set my makeup with Givenchy’s Prisme Visage Powder in Popeline Rose—it’s been my favorite for years, as it gives a soft, creamy finish without looking too matte.
Step 2: Eyes
For a simple, iridescent look on the eyes, I applied Charlotte Tilbury’s Eyes to Mesmerize in the shade Marie Antoinette. This cream eyeshadow is perfect for an easy, everyday look and can also be layered with other shadows. I used my fingers and a MAC #217 brush to apply the shadow all over the lid, slightly winging it out at the outer corners to elongate the eyes. To add more depth, I used NARS’s Shadow Hill from the Wanted palette to define the crease and lower lash line.
For the inner corners of my eyes, I wanted something extra shimmery, so I used Makeup Forever’s Starlit Liquid in Gold Champagne, followed by NARS’s Delirium shade from the Wanted palette. The liquid shimmer is stunning on its own, but it also helps other shadows really pop. To define the upper lashes without using eyeliner, I lightly applied NYX’s gel eyeliner in dark brown along the lash line, then smudged it with a brush for a softer look.
Step 3: Lashes and Highlight
After curling my lashes, I applied Dior’s Diorshow Mascara Primer and two coats of Maybelline’s Pumped Up Colossal Volume Mascara. To brighten my eyes even more, I lined my inner waterline with white eyeliner from NYX. For a bold inner corner highlight, I used the Urban Decay x Kristen Leanne palette’s highlight, which is perfect for brightening up the eyes.
Step 4: Cheeks and Lips
For a fresh flush of color, I applied NARS’s Liquid Blush in Luster, which has become a recent obsession of mine. I gently tapped the blush into my skin with my palms for a natural, seamless blend. When it comes to lips, I prefer a low-maintenance stain, so I reached for Etude House’s Dear Darling Water Gel Tint in Chestnut Red for a pop of color that’s easy to wear throughout the day.
Step 5: Finishing Touches
To complete the look, I dusted Hourglass Cosmetics Ambient Lighting Powder in Diffused Light all over my face for a soft, glowing finish. As a final touch, I used my eyebrow pencil to dot a few freckles across my nose and tapped them in with my fingers for a more natural, sun-kissed look. Adding freckles after makeup really brings the face to life and gives it a youthful, fresh feel.
And that’s it! This glowy, natural makeup look is perfect for the weekend, whether you’re heading out with friends or just want to look effortlessly put together. Enjoy the weekend, and I hope you find this tutorial helpful!

发表回复