作者: admin

  • Can You Get Botox During Pregnancy? Here’s What You Need to Know

    Can You Get Botox During Pregnancy? Here’s What You Need to Know

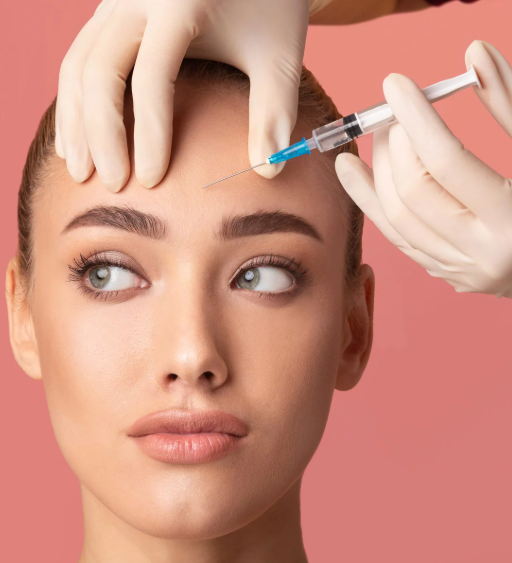
    Pregnancy brings a whirlwind of changes, and while many things are exciting, some require us to adjust our regular routines. One question that often pops up is whether it’s safe to get Botox while pregnant. Unfortunately, Botox isn’t a treatment you should consider while expecting. But if you’re curious about the reasons behind this, read on for all the details.

    What Is Botox?

    Botox is a popular cosmetic treatment that works by using botulinum toxin to temporarily paralyze muscles and smooth out wrinkles. It’s FDA-approved for treating issues like frown lines, crow’s feet, forehead wrinkles, and even conditions like excessive sweating and chronic headaches. Originally approved in the 1980s for medical uses, Botox is now widely used for aesthetic purposes.

    Is Botox Safe During Pregnancy?

    The short answer is no, Botox is not recommended during pregnancy. The lack of comprehensive research on its effects on pregnancy means doctors generally advise against it. While some animal studies suggest the botulinum toxin might not cross the placenta, these results don’t offer enough certainty to declare it safe for humans.

    Because the effects of Botox on pregnancy are not well understood, it’s best to err on the side of caution and avoid it altogether. After all, when it comes to your pregnancy, it’s better to be safe than sorry.

    Can Botox Cause Miscarriage?

    Although there is no direct evidence linking Botox to miscarriage, the uncertainty surrounding its safety is why medical professionals recommend avoiding it. The cause of a miscarriage is often difficult to pinpoint, and no one wants to introduce potential risks during this delicate time, especially during the first trimester. As a precaution, Botox injections should be avoided to ensure the healthiest pregnancy possible.

    When Should I Stop Getting Botox If I’m Pregnant?

    If you’re planning to get pregnant, it’s advisable to stop Botox treatments before you start trying. If you find out you’re pregnant after having Botox, there’s no need to panic, but you should stop any further treatments immediately. In the rare event that you’ve already received Botox while pregnant, some studies suggest no major issues for the baby, but it’s always a good idea to consult your healthcare provider for peace of mind.

    Pregnancy-Safe Alternatives to Botox

    Although Botox is off-limits during pregnancy, you don’t have to give up on skincare completely. Here are some pregnancy-safe options to help keep your skin looking its best:

    1. Hydrate and Moisturize: Drink plenty of water and use pregnancy-safe moisturizers to keep your skin soft and hydrated. Regular exfoliation can also help smooth out fine lines.
    2. Get Plenty of Sleep: Rest is crucial during pregnancy, and adequate sleep can help you feel and look fresher.
    3. Facial Peels: Mild glycolic and lactic acid peels are safe during pregnancy and can rejuvenate your skin. Avoid any treatments that contain salicylic acid.
    4. Hyaluronic Acid: This naturally occurring molecule helps skin retain moisture, making it an excellent ingredient in serums and creams for tackling fine lines.
    5. Peptides: Look for skincare products containing peptides like Argireline, which helps relax the skin and reduce the appearance of wrinkles in a gentle way, similar to Botox but without the injections.

    Final Thoughts

    While Botox is an effective treatment when you’re not pregnant, it’s best to avoid it during this special time. Instead, consider safe alternatives like proper hydration, sleep, and gentle skincare treatments to keep your skin glowing. And remember, if you’re ever unsure about any treatments during pregnancy, it’s always a good idea to check with your doctor.

    Your beauty shines through, especially during pregnancy, and taking care of yourself naturally can be just as rewarding as any cosmetic treatment.

  • Top Dupes for Milk Makeup Kush High Volumizing Mascara

    Top Dupes for Milk Makeup Kush High Volumizing Mascara

    Milk Makeup has become a well-loved brand, especially with their must-have products like the Hydro Grip Primer and Matte Cream Bronzer Sticks. But one product that stands out in their lineup is the Kush High Volumizing Mascara. Known for its thick, vegan formula, it delivers long, voluminous lashes without the clump factor. Unfortunately, this fan-favorite mascara often sells out quickly, leaving many searching for a comparable alternative. If you’re on the hunt for a dupe, here are some excellent options that give similar results.

    1. Glossier Lash Slick

    Glossier is the perfect brand for fans of the “no-makeup makeup” look, and their Lash Slick mascara is a fantastic dupe for Milk Makeup’s Kush Mascara. This lightweight formula provides natural-looking volume and length, enhancing your lashes without a heavy or clumpy finish. Its tiny bristles help coat each lash evenly, giving them a lift that can be built up for a more dramatic effect. If you prefer subtle, lengthened lashes that still stand out, this is a great option.

    2. Essence Lash Princess False Lash Effect Mascara

    For an incredibly affordable option, Essence Lash Princess False Lash Effect Mascara is a cult favorite. Priced at just $5, this mascara has gained viral status for its ability to create lash extension-like results. It adds both volume and length while separating and defining each lash, resulting in a fluttery, false-lash effect without clumps or flakes. If you’re looking for volume on a budget, this mascara should be your go-to.

    3. CoverGirl Exhibitionist Mascara

    CoverGirl’s Exhibitionist Mascara is another fantastic alternative. It provides full, voluminous lashes in just one coat and offers a smooth, buildable formula that won’t flake or smudge throughout the day. Whether you want a soft, fluttery look or full-on glamour, this mascara is versatile and easy to work with. Its unique ability to create a soft, natural finish while building volume makes it an ideal choice for a daily lash lift.

    4. Rare Beauty Perfect Strokes Universal Volumizing Mascara

    Rare Beauty’s Perfect Strokes Universal Volumizing Mascara is a standout product from the brand, known for its nourishing properties. Much like the Milk Makeup Kush Mascara, it conditions lashes while providing volume, lift, and length. It contains castor oil to help maintain lash health with every use. This mascara can be worn for a more natural look or built up for a more dramatic effect, making it a great option for both day and night.

    5. Urban Decay Wild Lash Plant-Powered Volumizing Mascara

    Urban Decay’s Wild Lash Plant-Powered Volumizing Mascara is a fantastic high-performance dupe for Milk Makeup’s Kush Mascara. It boasts a vegan formula made with 99% natural ingredients, and its bio-based fibers and innovative brush design work wonders to lift and separate lashes without clumping. This mascara delivers a fluffy, voluminous lash look that mimics the effects of lash extensions. While it’s slightly more expensive than Milk Makeup’s mascara, it offers long-lasting results that can last up to 16 hours, making it a solid alternative.

    Conclusion

    Finding a great dupe for Milk Makeup’s Kush High Volumizing Mascara doesn’t mean compromising on quality. Whether you’re after a natural, lengthened look or full-on voluminous lashes, the options above provide similar effects without the higher price tag. From budget-friendly picks to high-end alternatives, there’s a dupe out there to suit your preferences and give you that gorgeous, dramatic lash look.

  • Acrylic Nails vs. Dip Nails: Which Is the Right Choice for You?

    Acrylic Nails vs. Dip Nails: Which Is the Right Choice for You?

    When it comes to manicures, there are several options available to give your nails that polished, long-lasting look. Acrylic nails and dip nails are two popular choices, each offering unique benefits and features. If you’re considering which of these two treatments to try, here’s a breakdown of the key differences to help you make an informed decision.

    What Are Acrylic Nails?

    Acrylic nails are a well-known type of artificial manicure that uses a combination of liquid monomer and powder polymer to create a durable nail extension. This mixture is applied to the natural nail and then shaped by a nail technician. The acrylic nails air dry, but they can be topped with a gel coat if needed for a glossy finish. Over time, these nails become hard and strong, providing a reliable foundation for a stylish manicure.

    One of the main appeals of acrylic nails is their versatility. They can be shaped to any length or style, including classic French tips, and they are incredibly durable once applied.

    What Are Dip Nails?

    Dip nails, on the other hand, have gained popularity in recent years, partly due to social media platforms like Instagram and TikTok. Known as SNS nails or Signature Nail System, dip nails involve applying a base coat to the natural nail, followed by dipping the nail into a colored powder. This is repeated until the desired thickness is achieved, and a topcoat is applied to seal the nails.

    Dip nails are known for their longevity and strength, often lasting up to a month without chipping. They don’t require UV light to cure, which makes them a more convenient option for those who prefer a quicker treatment process.

    Key Differences Between Acrylic and Dip Nails

    While both acrylic and dip nails provide a stunning manicure, there are several differences to consider before choosing between the two:

    1. Application Process Acrylic nails require a nail technician to apply a combination of powder and liquid to create the nail extension. This process may take longer and involve stronger chemicals. Dip nails, however, are applied by dipping the nail into a colored powder, often resulting in a quicker and less chemical-intensive process.
    2. Durability Dip nails tend to last longer than acrylic nails, typically staying intact for up to a month. Acrylic nails, while still durable, generally last around two to three weeks before needing touch-ups.
    3. Layer Thickness Dip nails are known for being applied in thinner layers, which can create a more natural and sleek appearance. Acrylic nails, on the other hand, are typically thicker and may provide a more noticeable, sturdy extension.
    4. Health Concerns Both acrylic and dip nails can potentially harm the natural nail bed if not properly applied or removed. Acrylic nails require a strong glue, which can be damaging to the nails over time. Some dip powders may also contain harmful chemicals, so it’s essential to ask about the ingredients used in the salon or when purchasing products for home use.

    Cost Comparison

    The price of these two manicures can vary depending on location and salon, but generally speaking, dip nails tend to be more affordable, costing between $30 and $50 for a standard treatment. Acrylic nails, on the other hand, are usually more expensive, with costs typically ranging higher due to the additional materials and time required for application.

    Which Is Better: Acrylic or Dip Nails?

    Both acrylic and dip nails offer their own advantages depending on your preferences and needs.

    • Acrylic Nails: If you have brittle or short nails, acrylic nails can help add length and strength. They are perfect for special occasions like weddings or a night out, and they can also prevent you from biting your nails. However, the chemicals involved in acrylic nails may damage your natural nails if not carefully maintained.
    • Dip Nails: If you’re looking for a more natural look and longer-lasting wear, dip nails may be the way to go. They don’t require UV light and are typically stronger and more flexible than acrylic nails. Plus, the thinner layers provide a sleeker finish, making them ideal for classic designs like block colors or ombre effects.

    Ultimately, the decision between acrylic and dip nails boils down to your individual needs, the look you want to achieve, and how long you want your manicure to last. Both options are great for enhancing the appearance of your nails, but it’s important to consider how each treatment will impact your natural nails and overall style preferences.

  • Dysport vs Botox: Which One is the Right Choice for You?

    Dysport vs Botox: Which One is the Right Choice for You?

    As we age, we all notice those pesky lines creeping in—whether they’re frown lines, crow’s feet, or wrinkles around the lips. The desire to combat the signs of aging has led many to turn to injectable treatments like Dysport and Botox. While Botox has been the go-to for wrinkle treatments for years, Dysport is making a name for itself as an effective alternative. So, how do these two options stack up against each other? Let’s break down the key differences and similarities.

    What Are Dysport and Botox?

    Both Dysport and Botox are injectable treatments made from botulinum toxin, a neurotoxin that temporarily paralyzes the muscles beneath the skin. While they are derived from the same substance, their formulations differ in potency, which impacts how they work and how much is needed for each treatment.

    Both of these treatments are popular for reducing the appearance of wrinkles by relaxing the facial muscles that cause them. Although they have similar applications, the main difference lies in the concentration of botulinum toxin. Botox tends to be more concentrated, while Dysport is more diluted. This means that, for some areas, you might need more units of Dysport to achieve the same results as Botox.

    The Cost Comparison: Dysport vs Botox

    When considering the cost of treatment, many assume that Dysport would be more expensive because you need more units for the same effect. However, the price per unit for Dysport is typically lower than Botox, meaning the overall cost can often be quite comparable.

    That being said, because more Dysport units may be required, you might end up paying close to the same amount as Botox, depending on the area being treated. Ultimately, the cost will depend on how many units are needed for the area you want to treat, so it’s best to discuss this with your provider beforehand.

    Pros and Cons of Each Treatment

    Neither Dysport nor Botox can fully erase wrinkles, but both can significantly soften their appearance. Both options are particularly popular when traditional anti-aging creams and serums no longer provide the desired results.

    Dysport is particularly effective for treating moderate to severe glabellar lines, the vertical lines that form between the eyebrows. It tends to work faster than Botox, with results typically visible within two to three days. However, it is not the best option for those with mild wrinkles.

    On the other hand, Botox works well on a wider variety of wrinkles, including forehead lines, crow’s feet, and frown lines. Botox generally takes about a week to show noticeable results, making it ideal for people with mild to moderate wrinkles.

    When deciding between the two, it’s important to consider the severity and location of your wrinkles. Dysport is faster-acting and may be more suited for deeper lines, while Botox could be the better choice for fine lines and prevention.

    Which One Lasts Longer?

    Both treatments typically reach their peak effectiveness around the two-week mark. After that, you can expect your results to last for three to four months. However, Botox may last slightly longer, particularly for people with milder wrinkles. Some people report that Botox lasts up to six months, making it a more cost-effective option in the long run.

    When choosing between Botox and Dysport, consider the areas you want to treat and how long you expect the results to last. If you have more severe wrinkles or want quicker results, Dysport might be the better choice. But if you’re looking for longer-lasting results, Botox could be the way to go.

    Which One Is Right for You?

    Ultimately, choosing between Botox and Dysport comes down to your personal preferences, the severity of your wrinkles, and how quickly you want to see results. Both treatments are effective at reducing signs of aging, so the decision largely depends on your unique needs and which one your dermatologist recommends for your skin type and concerns.

    If you’ve already had Botox and are considering a change, Dysport might offer a fresh alternative that could provide quicker results. However, if you’re new to injectables, either treatment can give you a smoother, more youthful appearance—just be sure to consult with a licensed professional to help guide your decision.

    Both Dysport and Botox are great options for achieving younger-looking skin, but understanding the differences will help you make an informed choice.

  • How Long Does Microblading Really Last? A Comprehensive Guide

    How Long Does Microblading Really Last? A Comprehensive Guide

    The trend of having perfectly shaped brows has never been more popular. Full, well-defined eyebrows are all the rage, and many people are turning to microblading as a solution to achieve those stunning, thick brows. If you’ve been considering this semi-permanent procedure but are wondering how long it lasts, you’re not alone. Let’s explore everything you need to know about the longevity of microblading.

    What is Microblading?

    Microblading is a cosmetic tattooing technique used to enhance the appearance of eyebrows. The procedure involves using a small handheld tool with tiny needles to apply pigment to the skin, creating realistic, hair-like strokes that blend seamlessly with your natural brow shape. The result is well-defined yet natural-looking brows. The process is often referred to as “feathering” because of the fine, delicate strokes created by the tool.

    Microblading does not penetrate deep into the skin like traditional tattoos. Instead, the pigment is applied to the top layer of the skin (epidermis), ensuring that the results look soft and natural. The procedure is relatively pain-free, with most people experiencing only mild discomfort.

    How Long Does Microblading Last?

    One of the most common questions about microblading is how long the results will last. While it varies from person to person, the typical lifespan of microblading is between 18 to 30 months. Factors that influence this duration include your skin type (oily skin tends to fade the pigment more quickly), lifestyle habits, and how well you take care of your brows after the procedure.

    Even though the results last for an extended period compared to other brow makeup products like pencils or powders, it’s important to note that microblading is not permanent. Over time, the pigment will naturally fade, and touch-ups are required to maintain the sharpness and definition.

    Does Microblading Fade Completely?

    If you’re wondering whether microblading will disappear entirely, the answer is yes, eventually. However, the fading process can take time. While the results are semi-permanent, they usually begin to soften and fade within 18 months. If you don’t like how your microbladed brows look or if they fade unevenly, you can always visit a professional to remove the pigment. There are laser removal options available, but they should only be performed by a licensed technician.

    Does Microblading Damage Natural Eyebrows?

    A common concern with microblading is whether it will harm your natural eyebrows. The good news is that when done correctly, microblading does not damage your natural brow hairs. The pigment is applied to the skin, not the hair itself, so your hair growth will not be inhibited. However, if you’re expecting microblading to stimulate new hair growth or restore brows that are thin due to over-plucking, it may not provide that result.

    How Often Should You Get Touch-Ups?

    Microblading typically lasts anywhere from 18 to 30 months, but to keep your brows looking their best, you’ll need to schedule touch-ups. Most people go for a touch-up once or twice a year to refresh the pigment and keep their brows looking full and defined. If you wait too long between touch-ups, the pigment may fade completely, requiring you to redo the entire procedure.

    Think of microblading touch-ups like getting your hair color done—just as you go to the salon for a root touch-up when your color fades, your brows will need the same attention.

    Are Microbladed Eyebrows Worth It?

    Microblading is a great solution for those who struggle with sparse or uneven brows. It saves time and effort spent filling in your brows with makeup daily and provides a natural-looking, long-lasting result. While the exact duration of the results can vary, the procedure offers impressive, on-trend brows that require minimal maintenance.

    Before going ahead with the procedure, it’s crucial to do your research and choose a licensed and experienced practitioner. Ask about their techniques, the healing process, and the aftercare needed to ensure the best results.

    Microblading is a popular and effective way to achieve beautiful brows, but as with any cosmetic procedure, it’s important to understand the long-term commitment and maintenance required to keep them looking perfect.

  • How to Safely Remove Eyelash Extensions at Home: A Complete Guide

    How to Safely Remove Eyelash Extensions at Home: A Complete Guide

    Eyelash extensions are a popular beauty trend that gives you long, voluminous lashes without the hassle of mascara or falsies. While they offer a stunning, low-maintenance look, removing them can be tricky if you can’t make it to the salon. Whether you’re looking to save money or simply prefer DIY solutions, here’s a step-by-step guide to safely remove your eyelash extensions at home without causing damage to your natural lashes.

    How Professionals Remove Eyelash Extensions

    Before diving into at-home removal, it’s important to understand how professionals handle the task. Lash technicians use specialized tools and products, such as gel removers or creams, that are safe for the delicate skin around the eyes. They also utilize precise techniques like the “banana-peel method” to gently remove extensions without harming your natural lashes. This process typically takes about 15 to 25 minutes and is done with caution to avoid irritation and damage.

    If you’re able to, visiting a professional is always the safest route. They have the proper tools and expertise to remove extensions without causing harm to your lashes or eyes.

    Removing Eyelash Extensions at Home

    If going to the salon isn’t an option, you can safely remove your eyelash extensions at home with the right methods and products. Here’s how to do it:

    1. Cleanse Your Face and Remove Makeup
      Start by using a makeup remover to clean your face thoroughly. This ensures that no makeup residue will interfere with the removal process.
    2. Use Steam to Loosen the Glue
      Steam helps to weaken the adhesive used to attach the extensions. To do this, fill a bowl with hot water, and carefully hover your face over the steam, covering your head with a towel to trap the heat. Stay in this position for 10-15 minutes. Alternatively, a hot shower can help achieve the same effect.
    3. Apply Oil to Break Down the Adhesive
      Once the steam has softened the glue, take a cotton pad or makeup sponge and dip it in coconut oil, olive oil, or an eyelash extension remover. Gently swipe the oil over your upper and lower lash lines, being careful not to get the oil in your eyes. The oil helps to dissolve the glue and makes the extensions slip off more easily. You can repeat this process the next evening if necessary.
    4. Gently Remove Extensions
      After applying the oil, use a gentle motion to remove the extensions. Avoid pulling or tugging, as this can damage your natural lashes. If some extensions are stubborn, don’t force them off—simply repeat the oil application and give it some time to work.
    5. Wash Your Face and Brush Your Lashes
      After you’ve removed the extensions, wash your face as usual. Follow up by brushing through your lashes with a lash wand to help separate and clean your natural lashes.

    Can I Use Vaseline to Remove Eyelash Extensions?

    Vaseline, or petroleum jelly, is another option for removing eyelash extensions. It’s effective because it helps to break down the adhesive. However, you must use it carefully. Since Vaseline is quite heavy and greasy, it can cause your natural lashes to weaken if used too frequently. Always ensure that you’re using pure Vaseline and not a cheap imitation that could be harmful.

    Can Baby Oil Help Remove Eyelash Extensions?

    Baby oil is another gentle alternative for removing eyelash extensions. It works in much the same way as coconut or olive oil. Apply baby oil to your lashes after steaming, and gently rub it over the lashes to dissolve the glue. Let it sit for a few minutes before gently removing the extensions.

    Why Won’t My Eyelash Extensions Come Off?

    If your extensions aren’t coming off easily, don’t be tempted to pull them off. Picking or tugging at the lashes can cause significant damage to your natural lashes, leading to breakage and even permanent loss. Instead, be patient and allow time for the oil or remover to dissolve the adhesive. It may take a couple of sessions to fully remove all the extensions, especially if you’re using natural oils.

    Will My Natural Lashes Grow Back After Extensions?

    Eyelash extensions are applied to your natural lashes, and when removed incorrectly, they can cause damage. However, if you’ve removed the extensions safely and avoided any damage, your natural lashes should grow back within a few months. Just be sure to give your lashes some time to recover before getting extensions again.

    Conclusion

    Removing eyelash extensions at home doesn’t have to be a stressful or damaging process. By following these tips and using gentle, effective products, you can safely remove your extensions without compromising the health of your natural lashes. Be patient, and remember that taking your time is key to avoiding damage. If you’re ever unsure or feel uncomfortable, it’s always best to seek professional help to ensure the safest removal process.

  • How to Curl Your Lashes for a Long-Lasting Hold

    How to Curl Your Lashes for a Long-Lasting Hold

    Lashes play a crucial role in enhancing your overall makeup look. Whether you’re applying a coat of mascara, adding dramatic falsies, or opting for lash extensions or a lift, there are various ways to make your lashes stand out. However, not everyone is naturally blessed with long, voluminous lashes, and many of us struggle with straight, short, or blonde lashes that need extra help.

    If mascara alone isn’t giving you the desired effect, curling your lashes might be the solution. Here’s a step-by-step guide on how to curl your lashes effectively and make that curl last.

    The Right Way to Curl Your Lashes

    Curling your lashes is an easy and effective way to make your eyes look more awake and your lashes appear longer. An eyelash curler should be a staple in your beauty toolkit, and learning how to use it properly will make all the difference. If you’re new to lash curling, follow these tips for the best results.

    Before or After Mascara?

    The first question that often comes up is whether to curl your lashes before or after applying mascara. The answer is clear: always curl your lashes before applying mascara.

    Curling after mascara can cause the mascara to stick to the curler, which can lead to clumping and potentially damaging your lashes. To avoid unnecessary tugging or friction, make sure to curl your lashes first, before applying any product.

    Warm Up Your Curler

    Here’s a pro tip: try warming up your eyelash curler slightly. But remember, the key is “slightly”—you want it to be warm enough to help set the curl, but not so hot that it burns your lashes.

    You can warm your curler by running it under hot water for a few seconds or gently heating it with a blow dryer. Test the temperature on your wrist to make sure it’s comfortable before using it on your lashes. A warm curler helps the curl hold longer throughout the day.

    Curling Technique

    When you’re ready to curl, place the curler at the base of your lashes, as close to your lash line as possible, without touching your eyelid. This will give you the appearance of longer lashes and lift your eyes. Squeeze the curler gently, but firmly, and pulse it 2-3 times, holding each pulse for about 10-15 seconds. This will help you achieve a more natural, deeper curl.

    Lock in the Curl

    Once your lashes are perfectly curled, finish the look with your favorite mascara. This will not only lock the curl in place but also add extra volume, length, and definition to your lashes. Be sure to use a mascara that suits your lash needs—whether you want extra volume, length, or curl-enhancing properties.

    With these simple steps, your lashes will have that stunning lift and curl that lasts all day!

  • Can You Use Eyeliner as Lip Liner and Vice Versa? Here’s What You Need to Know

    Can You Use Eyeliner as Lip Liner and Vice Versa? Here’s What You Need to Know

    Lip liners and eyeliners—both used to define and accentuate, and often in similar shades—might seem like interchangeable products. But can you use one in place of the other? Let’s dive into the facts and safety tips, so you can avoid any mishaps when experimenting with your makeup.

    Eyeliner and Lip Liner: Not the Same

    Though both products serve a similar purpose, lip liners and eyeliners are formulated differently. While the pigments in both products may seem similar, they are designed for different areas of your face, and using the wrong product in the wrong place can be risky.

    Lip liners are made with pigments that are intended specifically for the lips. Some of these pigments, when applied near your eyes, can cause irritation or, in extreme cases, even damage your eyesight. In contrast, the pigments in eyeliners are tested to be safe for use on the delicate skin around the eyes.

    So, despite the temptation, it’s essential to stick to using lip products on your lips and eye products on your eyes. Your eyes are sensitive, and using makeup not designed for that area can lead to irritation, infection, or even permanent damage.

    Why Lip Liner Isn’t Suitable for Eyeliner

    While lip liners might contain moisturizing ingredients that are great for the lips, these additives aren’t ideal for the eyes. Eyeliner, on the other hand, typically contains ingredients that have a drying effect, which helps prevent smudging and ensures a long-lasting look on your eyelids. If you try using lip liner on your eyes, you might end up with a smudgy mess that won’t stay put. Plus, lip liner can irritate the eyes and cause discomfort, especially if it gets into your eyes.

    What Can You Use Instead of Eyeliner?

    If you’re looking to create a bold eyeliner look but don’t want to rely on traditional eyeliners, there are some fun and safe alternatives. One of the easiest options is using eyeshadow as eyeliner.

    To do this, wet a small brush with water (make sure to wring out the excess), dip it into your favorite eyeshadow, and apply it as if it were liquid eyeliner. The wet eyeshadow will apply smoothly, giving you a bold, defined look without the irritation that can come from using the wrong product. A quick spritz of setting spray will help lock everything in place.

    Homemade Eyeliner

    If you’re feeling creative, you can even make your own eyeliner at home. It’s simple, natural, and cost-effective. Here’s a quick recipe for a homemade eyeliner:

    • A pinch of beeswax (Vaseline can be a substitute)
    • Activated charcoal to achieve the desired shade (cocoa powder works too!)
    • ¼ teaspoon water
    • ½ teaspoon oil

    Melt the beeswax and oil together, mix in the other ingredients, and store the mixture in a small, airtight container. You can even add a few drops of vitamin E oil for an extra boost of skincare. This homemade liner is easy to apply and safe for your skin.

    Using Eyeliner as Lip Liner

    What about the reverse—can you use eyeliner as lip liner? Fortunately, the answer is yes. Since your lips are much less sensitive than your eyes, it’s safe to use eyeliner as lip liner. In fact, eyeliner can be more effective than traditional lip liners, especially if you’re looking for something waterproof and long-lasting.

    However, one thing to keep in mind is that eyeliner can be quite drying. To keep your lips soft and moisturized, be sure to apply a lip balm or moisturizing product before using eyeliner as a lip liner. This will help prevent your lips from becoming dry and flaky.

    Conclusion

    In short, while you can safely use eyeliner as lip liner, the reverse is not a good idea. Lip liner should stay on your lips, and eyeliner should be reserved for your eyes to avoid irritation or damage. If you’re looking for alternatives to traditional products, there are plenty of eye-friendly options out there—whether it’s eyeshadow as eyeliner, homemade recipes, or even creative use of your existing makeup products. Stay safe and have fun experimenting with your makeup!

  • 7 Surprising Dry Shampoo Alternatives That Actually Work

    7 Surprising Dry Shampoo Alternatives That Actually Work

    We all know that washing our hair every day isn’t the best for its health, but there’s something about that freshly-washed feeling that’s hard to beat. Unfortunately, by day two (or three), the magic starts to fade, and many of us reach for dry shampoo to freshen up. While dry shampoo works in a pinch, it can come with some downsides—harsh chemicals, heavy fragrances, and clogged pores, to name a few. Plus, even the most affordable options can get pricey. So, what’s a better alternative?

    Luckily, you don’t need to run to the store every time you need a quick fix. There are simple, safe, and affordable dry shampoo alternatives that you likely already have in your kitchen. Let’s take a look at some surprising options that can keep your hair feeling fresh without the need for store-bought products.

    1. Baby Powder

    Baby powder is one of the most straightforward and cost-effective alternatives to dry shampoo. It works by absorbing moisture and buildup without clogging your pores. Baby powder doesn’t contain harsh chemicals, making it a gentle option for refreshing your hair. Simply sprinkle some on your scalp, brush it through, and style as usual.

    2. Cornstarch

    If you have cornstarch sitting in your pantry, you’re in luck. It’s a fantastic dry shampoo alternative! Unlike baby powder, cornstarch is fragrance-free and still manages to absorb oil without leaving any heavy residue. It’s soft and blends seamlessly into your hair, making it ideal for a quick refresh.

    3. Baking Soda

    Baking soda is a well-known home remedy, and for good reason. It’s an excellent moisture-absorbing agent and can help absorb oil from your scalp. However, baking soda is a bit more abrasive, so it’s better suited for people with very oily scalps. Use it sparingly, as overuse can lead to dryness or scalp irritation.

    4. Cocoa Powder

    For those with darker hair, baby powder may not be the best option, as it can leave an ashy residue. Instead, try cocoa powder. When mixed with baby powder or used alone, cocoa powder blends seamlessly into darker hair tones. It also contains hair-strengthening proteins and antioxidants that are good for your hair’s health.

    5. Arrowroot Powder

    Arrowroot powder, often used in gluten-free baking, is an excellent option for those seeking a finer texture in their dry shampoo. It absorbs oil without leaving behind a heavy residue. Though it’s a bit pricier and harder to find than baking soda, it’s a great alternative for those looking for a gentle and effective option. Arrowroot is packed with nutrients that your hair will appreciate, making it a top contender for dry shampoo alternatives.

    6. Hand Sanitizer

    You may not have considered hand sanitizer as a hair care product, but it can serve as a quick fix in a pinch. The alcohol in hand sanitizer helps absorb moisture, making it effective for absorbing oil in your hair. However, it’s essential to use this sparingly. Frequent use of alcohol-based products can dry out your hair and scalp, potentially leading to damage over time.

    7. Paper Towels

    When you’re in a bind and don’t have any other dry shampoo alternative on hand, a simple paper towel can do the trick. While it may not be as effective as other options, it can absorb some oil in a pinch. I’ve used paper towels to blot my roots between gym sessions and meetings. It’s not a permanent solution, but it works when you need it most.

    My Favorite Homemade Dry Shampoo Recipe

    These ingredients work well individually, but together, they create a powerful, natural dry shampoo. Here’s my go-to recipe:

    • 1 cup arrowroot powder or cornstarch
    • 4 tbsp bentonite clay
    • 2 tbsp baking soda
    • A few drops of your favorite essential oil (lavender or peppermint works great)

    Mix all the ingredients together, and store the blend in an empty spice shaker. This DIY dry shampoo is great for refreshing your hair and absorbing excess oil. If you have darker hair, add some cocoa powder to prevent any ashy residue from showing up.

    Things to Keep in Mind

    While dry shampoo alternatives can be a great quick fix, they’re not a replacement for a full wash. If you have time, simply rinsing your hair in the shower (without shampoo) can help remove excess dirt and oil. It’s a simple way to refresh your hair without starting from scratch with styling. Remember, these alternatives are best for the days when you need a quick touch-up, not as a long-term solution for your hair care routine.

    With these easy alternatives, you can maintain that fresh hair feeling without relying on store-bought dry shampoos. Plus, you’ll save money and avoid the chemicals often found in commercial products.

  • Mane ‘n Tail Shampoo: Is It Good for Human Hair?

    Mane ‘n Tail Shampoo: Is It Good for Human Hair?

    If you’re curious about Mane ‘n Tail shampoo, you’re not alone. Originally developed for horses, this shampoo has made its way into the human beauty market, with many people swearing by its results. But is it really good for your hair, or is it just a marketing gimmick? Let’s break down the facts and explore what makes this shampoo unique.

    What Is Mane ‘n Tail Shampoo?

    Mane ‘n Tail shampoo was first created in the 1970s to maintain the health and shine of horse coats. However, it wasn’t long before people began using it on their own hair, and the results were positive enough for the company to expand its product line for human use. Today, they offer a variety of products, including those designed for color-treated hair.

    The main appeal of Mane ‘n Tail shampoo lies in its formulation, which includes a mix of ingredients designed to promote hair health. Let’s dive into the key ingredients that make it effective:

    • Water: The base of most shampoos, making up about 80% of the formula.
    • Sodium Lauryl Sulfate: A cleansing agent that helps the shampoo lather. While it can be harsh, it’s diluted here to minimize irritation.
    • Cocamidopropyl Betaine: A mild surfactant that adds bubbles and stabilizes the formula.
    • Salt: Acts as a thickening agent.
    • Glycol Distearate: Provides a pearly, shiny appearance to the shampoo.
    • Fragrance: Gives the product a pleasant scent.
    • Hydrolyzed Collagen: Moisturizes and nourishes the scalp with a chain of peptides.
    • Citric Acid: An exfoliant that helps remove dead skin cells for a cleaner scalp.
    • Methylchloroisothiazolinone: An antibacterial and antifungal ingredient that’s best rinsed out quickly.

    These ingredients work together to clean and nourish your hair, but it’s important to note that, like all products, they affect different people in different ways.

    Does Mane ‘n Tail Promote Hair Growth?

    One of the reasons Mane ‘n Tail became so popular is its reputation for promoting hair growth. While there’s no magic formula that will make your hair grow overnight, the shampoo contains proteins, including keratin, which strengthen and protect the hair shaft. This can lead to less breakage, allowing your hair to grow longer and healthier over time.

    Will Mane ‘n Tail Thicken Your Hair?

    Despite rumors, no shampoo can truly thicken your hair. However, Mane ‘n Tail’s ingredients help repair and protect the hair cuticle, which can give your hair the appearance of being thicker and fuller. It’s more about hair health than volume enhancement.

    How Often Should You Use Mane ‘n Tail Shampoo?

    Using Mane ‘n Tail daily may not be the best option for everyone, as some people may experience scalp irritation from the cleansing agents. Generally, experts recommend washing your hair 2-3 times a week to prevent over-drying. If you’re new to this shampoo, try using it every few days to see how your hair and scalp respond.

    If you notice dryness or itching, you might want to reduce usage and alternate with a gentler shampoo.

    What Other Mane ‘n Tail Products Should You Try?

    Due to the success of their original formula, Mane ‘n Tail has expanded its line to include products specifically for human use. They offer everything from herbal anti-frizz sprays to UV-protection shampoos for color-treated hair, as well as leave-in conditioners and deep moisture treatments. Each product has received rave reviews for its effectiveness.

    Conclusion

    Mane ‘n Tail shampoo was originally designed for horses, but thanks to some adventurous individuals, it has become a go-to product for many people looking to enhance the health and appearance of their hair. While it may not live up to all the myths surrounding it, the shampoo offers real benefits like strengthening hair, improving scalp health, and reducing breakage. If you’re looking for a budget-friendly, effective product, Mane ‘n Tail could be a great option for you.